credits: Monica Lazar – “Eat, love and be happy” blog
Vi avevo presentato Monica Lazar del blog “Eat, love and be happy” (il sito si sta rifacendo il look ma tornerà presto online) e la sua golosissima torta cremosa al cioccolato con soli albumi poco tempo fa, oggi torna a trovarci con un articolo inedito dedidato ad un nuovo “dietro le quinte” ricco di consigli per migliorare le foto utilizzando strumenti economici ed efficienti inoltre, ci svelerà come utilizzare alcuni strumenti di Photoshop per rendere unici i nostri scatti.
Pronti a prendere appunti? Via!
Grazie Monica.
How to – Dietro le quinte del blog “Eat, love and be happy”
“Eat, love and be happy” – behind the scenes
.
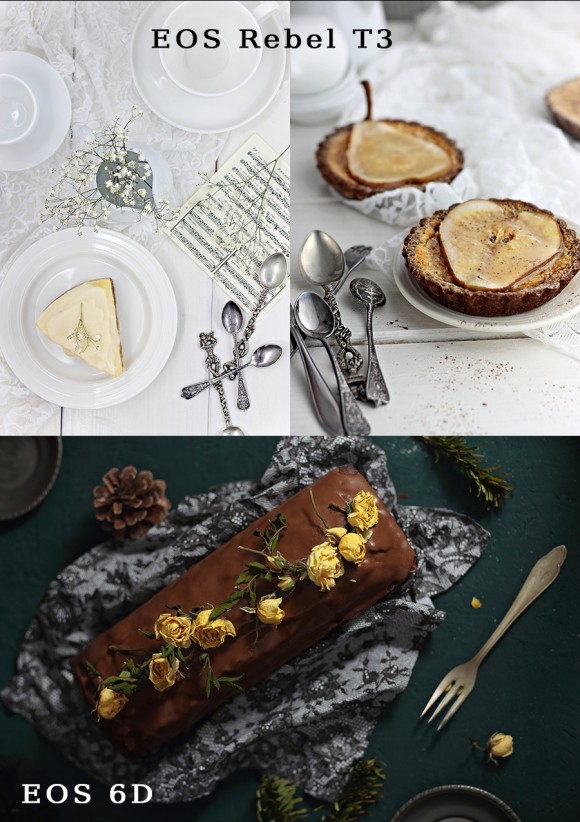
Tutto è iniziato quasi due anni fa. La mia prima macchina fotografica è stata una Canon T3 (con un obiettivo f/1.8 50mm) e l’ho usata fino a Novembre 2013 poi sono passata ad una Canon 6D. Probabilmente ti aspetterai che dica che una fotocamera migliore significa foto migliori ma non è così. Per me fotocamera migliore significa solo maggiore controllo e minore post-elaborazione. Sono sicura che saprai che c’è una differenza enorme tra una T3 e una 6D, però sono contenta che questa differenza non sia evidente quando guardo le mie foto. Utilizzare una T3 mi ha aiutato ad imparare di più. Ci sono stati momenti in cui ero arrabbiata perché le mie foto non erano belle come avrei voluto ma questo mi ha costretto a compensare attraverso la composizione. Ho guardato centinaia di foto di food e ancora foto di still life (e lo faccio ancora) analizzando ogni volta gli elementi che mi piacciono di più. Inoltre, prima di iniziare le riprese per un nuovo post penso a quale emozione vorrei trasmettere con quelle foto. Quindi se vuoi veramente fare qualcosa di buono, devi impegnarti a scoprire come farlo al meglio con solo quello che hai.
It all started almost two years ago. My first camera was a Canon T3 (with a 50mm f/1.8 lens) and I used it until November 2013 when I upgraded to a Canon 6D. Probably you expect me to say that a better camera means better photos, but no. For me, a better camera means just greater control and less post processing. I’m sure that you know what a huge difference is between a T3 and a 6D, however, I’m glad that this difference is not obvious when I look at my photos. Using a T3 helped me so much to learn more. There were many times when I was upset because my photos weren’t as good as I wanted them to be (higher image quality) but this forced me to compensate through composition. I looked at hundreds of food and still life photos (and I still do it) analyzing what is that thing that makes me love them. Also, before I start shooting for a new post, I think about what emotion I want to put in those photos. So, if you really want to do something good, you will find out how to do it with just what you have.
credits: Monica Lazar – “Eat, love and be happy” blog
Ho iniziato a fotografare con luce naturale, ma ho rinunciato rapidamente perché l’appartamento dove vivo non è davvero un luogo luminoso e oltre a ciò preferisco avere il controllo completo di quello che sto facendo. È molto più facile utilizzare l’illuminazione artificiale quando il tuo programma di lavoro o il luogo in cui vivi non consentono l’utilizzo della luce naturale. Ci riproverò sicuramente quando sarà possibile.
I started taking pictures in natural light, but I gave up quickly because the apartment where I’m staying for now is not really a bright place and, beside that, I prefer to have complete control over what I’m doing. It’s so much easier to use artificial lighting when your work schedule or the place you live in doesn’t allow you to use natural light. I will definitely use it when it will be possible.
credits: Monica Lazar – “Eat, love and be happy” blog
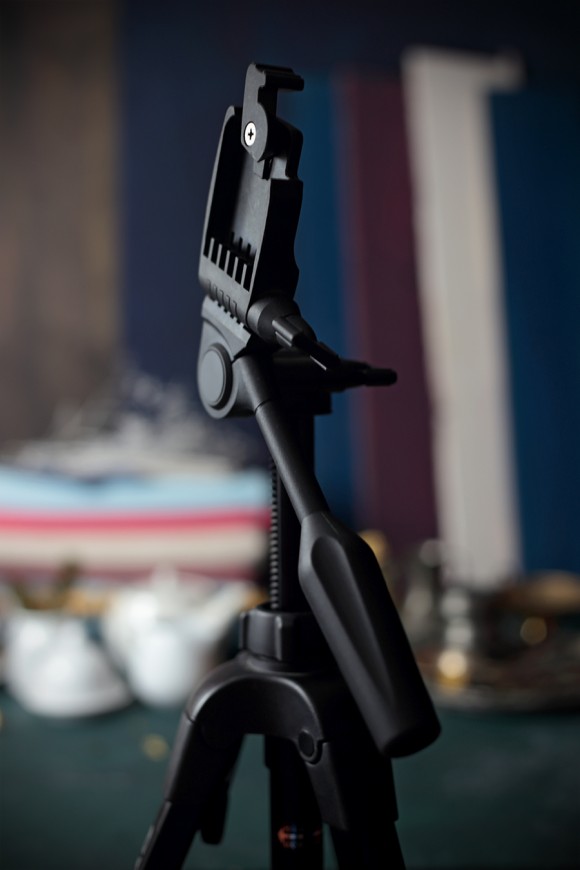
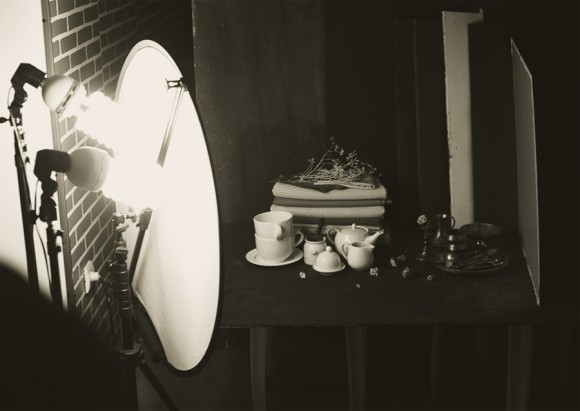
Quindi, il mio set di illuminazione artificiale contiene: 3 lampadine fluorescenti (105W, 5500K), 3 stand luce, un diffusore di luce, alcuni riflettori (non solo bianchi, ma anche neri, grigio e creano un bellissimo effetto dark) un treppiede e alcune tavole di legno che uso come sfondo. Il tutto mi è costato circa 250 $. Mica male no?
So, my artificial lighting equipment contains: 3 fluorescent bulbs (105W, 5500K), 3 light stands, a light diffuser, some foam board reflectors (not just white but also black; black boards create a beautiful effect in dark tone photography) a tripod and some wood boards that I use as background. It all costs about 250$ (I purchased everything from Romanian stores). I think it’s a small price for the results I had with this equipment.
credits: Monica Lazar – “Eat, love and be happy” blog
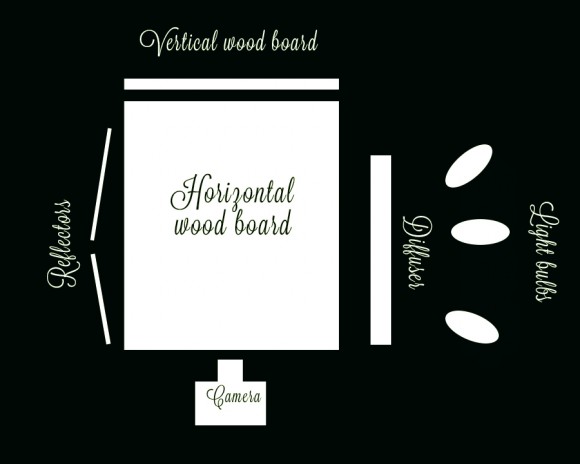
Ho preparato uno schema di illuminazione per aiutarti a capire come procedo io. Questa impostazione è quella che uso sempre, l’unica differenza è che a volte uso solo una o due lampade, a seconda del mio stato d’animo. Inoltre, ci sono momenti in cui uso un riflettore nero perché crea belle ombre e un bellissimo effetto chiaroscuro. Ho anche un regolatore di altezza per direzionare la luce dei pannelli. Come vedi preferisco la luce laterale. Qui c’è un interessante articolo sulla direzione della luce e che effetto ha sulle foto.
I made a lighting diagram to help you visualize what am I talking about. This set up is the one I always use, the only difference is that sometimes I use just one or two bulbs, depending on what mood I want to capture. Also, there are times when I use a black reflector because it creates beautiful shadows and a beautiful chiaroscuro effect. I also adjust the height of the light stands and the direction of light. As you see, I prefer side lightning. Here you have a good article about light direction and what effect it has on your pictures.
credits: Monica Lazar – “Eat, love and be happy” blog
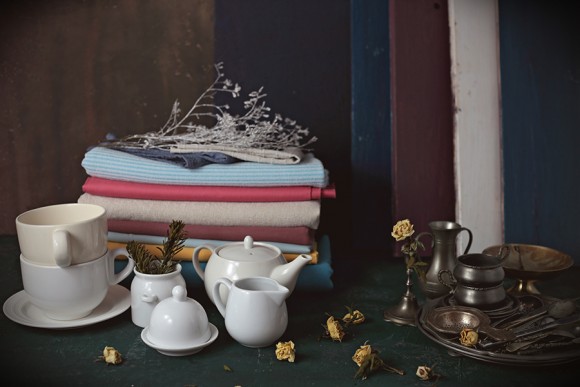
Come sfondo uso due assi di legno, spesso dello stesso colore, uno posizionato in orizzontale e uno verticale. Ho comprato questi sfondi da un negozio di ferramenta e li ho dipinto io. Quasi tutti i miei sfondi hanno colori scuri perché preferisco il genere “dark tone” per la fotografia di food.
As a background, I use two wooden boards, often of the same color, one placed horizontally and one vertically. I bought these boards from a hardware store and painted them myself. Almost all my boards are dark colors and that is because I prefer dark tone photography.
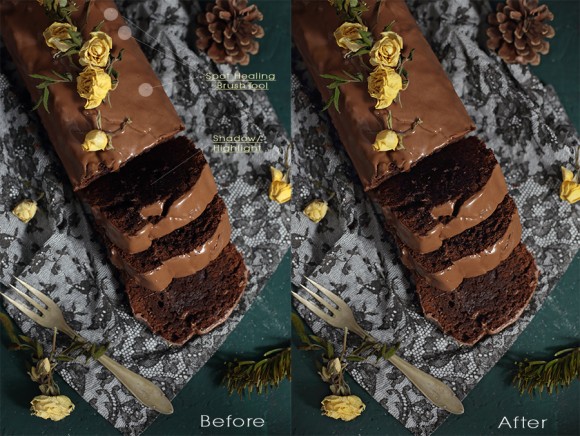
Scatto le mie foto solo in modalità manuale e la maggior parte delle volte utilizzo il collegamento con il pc. Per la post-elaborazione uso solo Photoshop. Le modifiche che faccio in Photoshop sono: Levels, Shadows/Highlights, Spot Healing Brush Tool se è necessario e Maschera di contrasto per i dettagli.
I take pictures only in M mode and most of the times I shoot tethered. For post processing I only use Photoshop. The adjustments I make in Photoshop are: Levels, Shadows/Highlights, Spot Healing Brush Tool if it is necessary and Unsharp Mask for sharpening.
credits: Monica Lazar – “Eat, love and be happy” blog
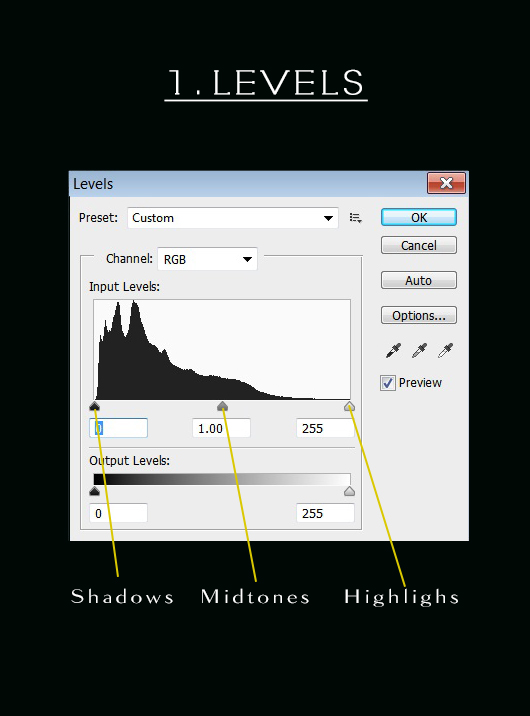
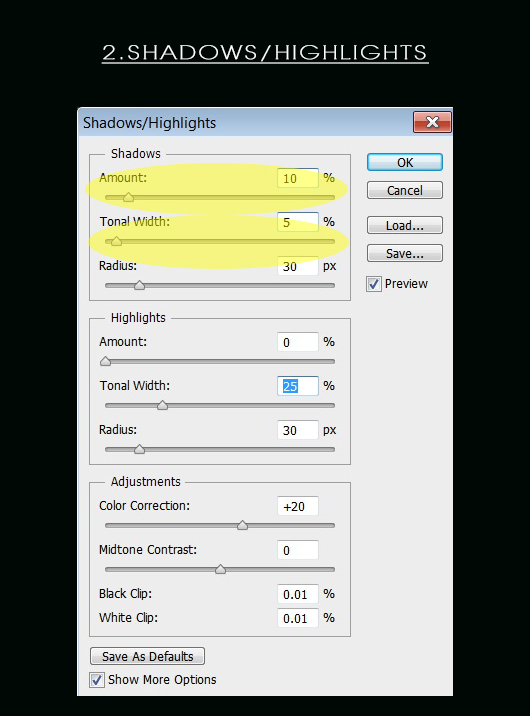
I Livelli (Image-Adjustments-Levels) mi servono per applicare effetti o regolare alcune aree dell’immagine. È possibile spostare le ombre, mezzitoni e le luci in base a ciò che si vuole ottenere. Image-Adjustments-Shadows/Highlights invece aiuta a far risaltare i dettagli dell’immagine. Per quasi tutte le mie immagini modifico leggermente la quantità e ampiezza tonale delle ombre (non faccio nessun cambiamento per le luci). Il primo cursore, Amount, controlla la quantità di luminosità che si desidera applicare alle ombre. Quanto più si trascina il cursore verso destra, più dettagli in ombra potrai recuperare. Se si trascina troppo lontano, ti schiarirà troppo le ombre. Il secondo slider, Tonal Width, determina l’intervallo di valori tonali che saranno interessati dalla regolazione. Nella sua impostazione più bassa, saranno interessate solo le aree più scure dell’immagine. Mentre si trascina il cursore Tonal Width verso destra, potrai ampliare la gamma di valori tonali interessati ad includere più mezzitoni.
Levels (Image-Adjustments-Levels) will correct the tonal range and color balance of an image by adjusting intensity levels of image shadows, midtones, and highlights. You can move the Shadows, Midtones and Highlights according to what you want to achieve.
Shadows/Highlights (Image-Adjustments-Shadows/Highlights) helps you bring out image detail. For almost all my images I just slightly change the Amount and Tonal Width of Shadows (I make no changes for Highlights). The first slider, Amount, controls the amount of brightening that you want to apply to the shadows. The further you drag the slider towards the right, more shadow detail you’ll recover. If you drag it too far, you’ll brighten the shadows too much. The second slider, Tonal Width, determines the range of tonal values that will be affected by the adjustment. At its lowest setting, only the darkest areas of the image will be affected. As you drag the Tonal Width slider towards the right, you’ll expand the range of affected tonal values to include more of the midtones.
credits: Monica Lazar – “Eat, love and be happy” blog
credits: Monica Lazar – “Eat, love and be happy” blog
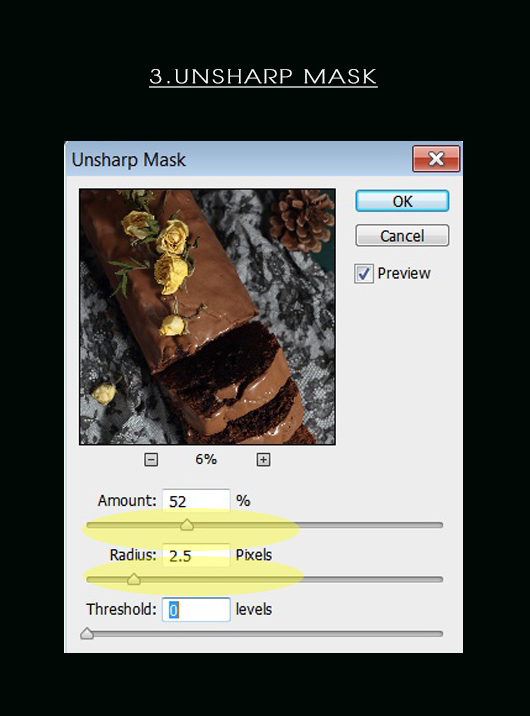
La maschera di contrasto (Filter-Sharpen-Unsharp Mask) fornisce tre controlli – Fattore, Raggio e Soglia. Il cursore Fattore determina quanta luce/buio vuoi dare o togliere ai pixel chiari/scuri. Se imposti un valore troppo alto, l’immagine apparirà sgranata e con un contrasto eccessivo, potrai perdere alcuni dettagli importanti. Il cursore Raggio determina l’area che verrà modificata. Un basso raggio significa che verranno modificati solo i pixel proprio accanto al bordo. Un alto raggio modificherà una zona più ampia. Anche qui è sempre meglio usare una via di mezzo. Il cursore Soglia determina la quantità di contrasto che si vuole ottenere tra i colori. Le impostazioni che si vedono nella foto qui sopra sono il massimo Amount e Radius che uso. La soglia è impostato su 0. Ma tutte queste impostazioni dipendono dalla dimensione dell’immagine e se si desidera utilizzarle per la stampa o meno. Più giochi con queste impostazioni più ti renderai conto cosa potrai ottenere con le tue immagini.
Unsharp Mask (Filter-Sharpen-Unsharp Mask) gives you three controls – Amount, Radius and Threshold. The Amount slider determines how light the lighter pixels get, and how dark the darker pixels get. If you set the amount too high, your picture will look grainy and overly contrasty, and you’ll actually lose some fine detail. The Radius slider determines the area that will be sharpened. A low radius means only the pixels right next to the edge will be sharpened. A high radius means a wider area will be sharpened. Setting the radius too high will give you weird outlines or halos around your edges. The Threshold slider determines how much contrast needs to be between colors for them to be sharpened. The settings that you can see in the photo are the maximum Amount and Radius that I use. The Threshold is set to 0. But all this settings depends on the image size and if you want to use it for print or not. The more you play with these settings the better you will realize what is best for your images.
credits: Monica Lazar – “Eat, love and be happy” blog
Se dovessi riassumere tutto quello che ho scritto concluderei così: non dimenticare di aggiungere emozione alle tue foto, anche se si tratta di cibo. L’attrezzatura fotografica non è ciò che conta di più. Il segreto dietro la fotografia di food è il lavoro e la dedizione, un consiglio: guarda e analizza un sacco di foto che reputi belle e studia cosa in quelle foto ti piace di più. Una buona foto è quella che avrà bisogno la quantità minima di post-elaborazione. Non contare su Photoshop ma sul fatto di scattare una buona foto in partenza.
Spero che il mio “dietro le quinte” sia stato utile e mi auguro che il mio lavoro possa essere fonte di ispirazione per coloro che amano la fotografia tanto quanto me.
If I were to summarize all that I wrote here, I would say it like this: Don’t forget to put emotion in your photos, even if it’s about food. The photo equipment is not what counts most. The secret behind amazing food photography is work and dedication. A tip: watch and analyze lots and lots of photos that you find beautiful and find those things that you like most. A good photo is one that will need the minimal amount of post processing. Do not count on Photoshop, take the best photo that you can.
I hope that my “behind the scene” story was useful for you and I wish that my work is inspiring for those that love photography as much as I do.
Puoi trovare Monica anche qui:
Leggi altri interessanti Dietro le quinte – Ti ricordo che puoi partecipare anche tu, scopri come.
Here you can find other useful Behind the scenes posts – You can participate too, write me!

Ancora una volta scopro un mondo tecnico, sì, ma anche magico! Grazie :-)
Sono sempre interessantissimi qs post, complimenti anche alla tua ospite !!
Grazie :)